STEP 1 : PREPARATION:
ITEMS AND TOOLS NEEDED
HIGH GRIT SANDPAPER
CONTACT CEMENT
UTILITY KNIFE
HELPFUL ACCESSORIES
LEVEL
WALLPAPER SEAM ROLLER
METAL RULER
PAINTING SUPPLIES
ADHESIVE OPTIONS FOR INSTALLATION
JOINT COMPOUND
POLYMER ADHESIVE
DRYWALL TYPE 1 TILE ADHESIVE
PRIMER/ SEALER
STEP 2 : INITIAL SURFACE PREPARATION
The product is made to install over relatively smooth flat surfaces. Surface must be clean, dry and free of loose debris. All major holes or major damage that could interfere with installation must be repaired prior to installation. When installing over glossy plaster or paint rough up the surface with sandpaper to dull the surface and create a tooth for bonding.
STEP 3 : TILE PREPARATION
Tiles should acclimate for 48 hours in the environment and temperature they will be installed in.
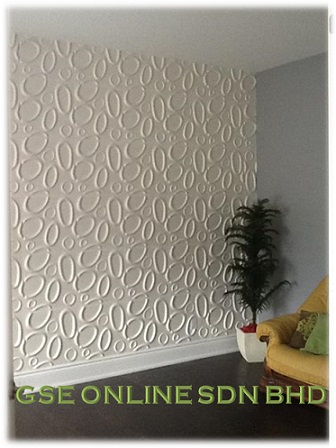
STEP 4 : INSTALLING WALL PANELS.
You must determine if the installation will be wall-to-wall, a floating design ( leave an even border all around to avoid cutting ), a strip of tiles, etc...It is important to have this well-thought-out before beginning.
If you are unsure, lay the tiles out on the floor or draw a grid on the wall to help you decide.
USING A PERMANENT ADHESIVE
For permanent installations, all commercial applications and tricky climatic conditions we recommend use of one of the above mentioned adhesives.
Follow the manufacturer’s instructions for adhesive use.
If you notice a tile with a slight bow, it can gently be flexed to help it lay as flat as possible before adhering to the wall.
Pay close attention to the edges and ensure they are as close to 100% flat as possible.
Use a wallpaper seam roller for this will be very helpful.
Take care in making sure the tiles are butted as tightly as possible to one another. This will help minimize seams.
Mastic will likely get on the roller and the tiles during installation, keep a damp rag handy to wipe off. It does not hurt the tiles or the roller if wiped while wet.
Minimize wiping as much as possible on tiles that have not been primed prior to going on the wall.
Blot as much as possible and wipe excess when needed.
Excessive wiping with a damp rag on unprimed tiles can cause the tiles to ball up small amounts of pulp.
PLACING THE TILES ON THE WALL
Regardless of the adhesion method, the tiles go on the wall the same way. The initial tiles that are positioned to be as straight as possible.
Take extra care when placing these tiles. Use a level to ensure proper alignment and take wall irregularities and other obstacles into account early on.
The tiles should be placed next to each other if desired, paying special attention to fitting them as close as possible to minimize the seams.
On a wall-to-wall install, when at all possible, work across the wall, moving toward the corner from the top, to minimize cutting, and the cut tiles will fall in more in conspicuous areas.
If you work from the center out, keep in mind the tiles that fall at the top, bottom and both edges will need to be cut. Plan your design well to ensure desired results are what you expect.
Remember, measure twice and cut once.
CUTTING THE TILES
In most installations you will probably need to cut some tiles.
The tiles will cut with a standard utility knife.
Make multiple passes on the tile, cutting deeper each time, as this will help to ensure a straight cut.
After cutting, use 350 grit sandpaper to lightly sand the cut edge.
FILLING GAPS
With a modular product, it is inevitable that you will have seams. If your wall is not completely straight, a tile is slightly out of position or you come to a corner where you have to cut a tile this situation may be exaggerated.
These are easily addressed with paintable caulk or joint compound.
Address seam issues before finish painting and after priming. Make sure you are happy with the tile adhesion before applying because it will crack or pull out of the joints if the panel is pulled away from its position.
Allow proper dry time, and re-apply if needed. Sand the seam slightly with a 350 grit sandpaper if needed, and brush away debris with a slightly damp rag.
Pay attention when using joint compound to manufacturers recommended temperature usage while wet.
Minimize wiping as much as possible on tiles that have not been primed prior to going on the wall.
Blot as much as possible and wipe excess when needed.
Excessive wiping with a damp rag on unprimed tiles can cause the tiles to ball up small amounts of pulp.
PRIMER AND FINAL SANDING
After all tiles are up and the seams have been filled, apply a light coat of sandable dry wall primer/sealer.
After the primer dries, we recommend a quick, light and gentle sanding over the entire wall.
This will help ensure a smooth surface for painting by removing any foreign debris accrued on the panel during the installation process. Use a 350 grit or higher sand paper.
STEP 5 : PAINTING
The wall panels are now ready to be painted. If you followed the preparation and installation instructions carefully, you should now have a tile wall ready to accept a latex paint.
The tiles can be brushed, rolled, or sprayed. When using a permanent adhesive method, spraying the tiles is fine.
In this instance, multiple light misting coats is preferred to one heavy coat, to avoid over saturation of tiles.
Follow the paint manufacturer’s instructions on the paint chosen for number of coats, climactic and environmental conditions, dry times, etc...
If you are using professional painters or wall covering installers, work with them to achieve the desired effect !
ALL KIND OF JOINT COMPOUND USED :
•Paintable Caulk
.Hydrated lime
•Slaked lime
•Painters Putty
•Paintable Acrylic Caulk.